Program uBlox GPS-module timepulse frequency (dynamically) with an Arduino

The uBlox GPS-modules are capable of providing various reference clock signals through the TIMEPULSE pin. By default, this pin outputs a 1 pulse-per-second (PPS) signal. For an upcoming project, a GPS disciplined oscillator (GPSDO), this output had to be adjusted to 100 kHz. Instead of using the manufactuer’s software, u-center, this task is supposed to be accomplished using an Arduino. This article shows how to (dynamically) adjust the TIMEPULSE reference signal using an Arduino.

General Overview

For my experiments, I used uBlox NEO M6, M7 and M8 modules. The modules were connected to a Laptop using a FT232RL-based UART to USB converter. Using the uBlox u-center software, the Timepulse 5 settings were adjusted to generate 10 kHz and 100 kHz signals with a duty cycle of 50 %. The generated commands were observed using the binary console view of the u-center software.

Setting the Timepulse 5 settings using the uBlox u-center software. Commands sent to the NEO-6 GPS module can be observed in the binary console view.

Setting the Timepulse 5 settings using the uBlox u-center software. Commands sent to the NEO-6 GPS module can be observed in the binary console view.

Those binary commands were then translated to C++ compatible arrays. These commands can now be sent to the GPS-modules using an Arduino quite easily. For instance, the command array to set Timepulse 5 to generate a 10 kHz reference signal with 50 % duty cycle, synchronized to UTC time if the receiver has a valid position fix is as follows:


// UBX CFG-TP5: Set 10 kHz, 50 uS Pulses (50 % duty-cycle), Synch UTC-Time, no output if GPS unlocked
byte TP5_10K_LOCK[]{0xB5, 0x62, 0x06, 0x31, 0x20, 0x00, 0x00, 0x01, 0x00, 0x00, 0x32, 0x00, 0x00, 0x00, 0x01, 0x00, 0x00, 0x00, 0x10, 0x27, 0x00, 0x00, 0x00, 0x00, 0x00, 0x00, 0x32, 0x00, 0x00, 0x00, 0x00, 0x00, 0x00, 0x00, 0x7F, 0x00, 0x00, 0x00, 0x73, 0xF3};

Sending this command to the GPS-module using the inbuilt UART can be accomplished as follows:

Serial.write(TP5_10K_LOCK, sizeof(TP5_10K_LOCK));

uBlox NEO-6 GPS module connected to an Arduino Uno for dynamic Timepulse 5 setting.

uBlox NEO-6 GPS module connected to an Arduino Uno for dynamic Timepulse 5 setting.

Another useful setting for GPS-locked frequency references is the CFG-NAV5 setting. It can be used to set the navigation mode to stationary.

// CFG-NAV5: Set navigation mode to stationary
byte CFG_NAV5_STATIONARY[] = { 0xB5, 0x62, 0x06, 0x24, 0x24, 0x00, 0xFF, 0xFF, 0x02, 0x03, 0x00, 0x00, 0x00, 0x00, 0x10, 0x27, 0x00, 0x00, 0x05, 0x00, 0xFA, 0x00, 0xFA, 0x00, 0x64, 0x00, 0x2C, 0x01, 0x00, 0x3C, 0x00, 0x00, 0x00, 0x00, 0x00, 0x00, 0x00, 0x00, 0x00, 0x00, 0x00, 0x00, 0x4E, 0x60 };

Note that all settings, including Timepulse 5 and CFG-NAV5, are volatile. That means the settings are lost upon power-cycling the module. This can be avoided by permanently storing the adjusted settings using the CFG-CFG-command.

// UBX CFG-CFG: Save all. BBR + FLASH:
byte CFG[] = {0xB5, 0x62, 0x06, 0x09, 0x0D, 0x00, 0x00, 0x00, 0x00, 0x00, 0xFF, 0xFF, 0x00, 0x00, 0x00, 0x00, 0x00, 0x00, 0x03, 0x1D, 0xAB };

After sending the CFG-CFG-command, all settings will be permanently stored and retrieved upon power-up. Therefore, a microcontroller is not necessary for operating a uBlox GPS-module as frequency reference. The settings can be adjusted dynamically during operation in order to generate different reference frequencies as needed.

Test Results

A simple and straight-forward Arduino sketch was written to test the commands on various uBlox modules. The code sets the Timepulse 5 output frequency to 10 kHz, the navigation mode to stationary and stores the settings permanently. It then goes on to change between 10 kHz and 100 kHz every 10 seconds. The Timepulse output was connected to an oscilloscope and the resulting waveforms were observed. As shown in the images below, the module successfully accepted the commands and alternatingly put out 10 kHz and 100 kHz signals when locked to a valid GPS-source.

100 kHz, 50 % duty-cycle output from a uBlox NEO-6M GPS module

100 kHz, 50 % duty-cycle output from a uBlox NEO-6M GPS module

10 kHz, 50 % duty-cycle output from a uBlox NEO-6M GPS module

10 kHz, 50 % duty-cycle output from a uBlox NEO-6M GPS module

Commands

Here is a list of useful commands in array-form for the Arduino IDE:

// UBX CFG-CFG: Save all. BBR + FLASH:
byte CFG[] = { 0xB5, 0x62, 0x06, 0x09, 0x0D, 0x00, 0x00, 0x00, 0x00, 0x00, 0xFF, 0xFF, 0x00, 0x00, 0x00, 0x00, 0x00, 0x00, 0x03, 0x1D, 0xAB };

// CFG-NAV5: Set navigation mode to stationary
byte CFG_NAV5_STATIONARY[] = { 0xB5, 0x62, 0x06, 0x24, 0x24, 0x00, 0xFF, 0xFF, 0x02, 0x03, 0x00, 0x00, 0x00, 0x00, 0x10, 0x27, 0x00, 0x00, 0x05, 0x00, 0xFA, 0x00, 0xFA, 0x00, 0x64, 0x00, 0x2C, 0x01, 0x00, 0x3C, 0x00, 0x00, 0x00, 0x00, 0x00, 0x00, 0x00, 0x00, 0x00, 0x00, 0x00, 0x00, 0x4E, 0x60 };

// UBX CFG-TP5 Timepulse 5: 10 kHz, 50 uS (50 % duty cycle), synch to UTC Time, No Putput when unlocked
byte TP5_10K_LOCK[]{ 0xB5, 0x62, 0x06, 0x31, 0x20, 0x00, 0x00, 0x01, 0x00, 0x00, 0x32, 0x00, 0x00, 0x00, 0x01, 0x00, 0x00, 0x00, 0x10, 0x27, 0x00, 0x00, 0x00, 0x00, 0x00, 0x00, 0x32, 0x00, 0x00, 0x00, 0x00, 0x00, 0x00, 0x00, 0x7F, 0x00, 0x00, 0x00, 0x73, 0xF3 };

// Timepulse 5: 100 kHz, 5 uS (50 % duty cycle), synch to UTC Time, No Putput when unlocked
byte TP5_100K_LOCK[]{ 0xB5, 0x62, 0x06, 0x31, 0x20, 0x00, 0x00, 0x01, 0x00, 0x00, 0x32, 0x00, 0x00, 0x00, 0x01, 0x00, 0x00, 0x00, 0xA0, 0x86, 0x01, 0x00, 0x00, 0x00, 0x00, 0x00, 0x05, 0x00, 0x00, 0x00, 0x00, 0x00, 0x00, 0x00, 0x7F, 0x00, 0x00, 0x00, 0x36, 0x36 };

// UBX CFG-TP5 Timepulse 5: 10 kHz, 50 uS (50 % duty cycle), synch to UTC Time, free running 10 kHz if unlocked
byte TP5_10K[] = { 0xB5, 0x62, 0x06, 0x31, 0x20, 0x00, 0x00, 0x01, 0x00, 0x00, 0x32, 0x00, 0x00, 0x00, 0x10, 0x27, 0x00, 0x00, 0x10, 0x27, 0x00, 0x00, 0x32, 0x00, 0x00, 0x00, 0x32, 0x00, 0x00, 0x00, 0x00, 0x00, 0x00, 0x00, 0x7F, 0x00, 0x00, 0x00, 0xDB, 0xFC };

// UBX CFG-TP5 Timepulse 5: 100 kHz, 5 uS (50 % duty cycle), synch to UTC Time, free running 100 kHz if unlocked
byte TP5_100K[] = { 0xB5, 0x62, 0x06, 0x31, 0x20, 0x00, 0x00, 0x01, 0x00, 0x00, 0x32, 0x00, 0x00, 0x00, 0xA0, 0x86, 0x01, 0x00, 0xA0, 0x86, 0x01, 0x00, 0x05, 0x00, 0x00, 0x00, 0x05, 0x00, 0x00, 0x00, 0x00, 0x00, 0x00, 0x00, 0x7F, 0x00, 0x00, 0x00, 0x61, 0x8E };

Arduino Code

/*
 * uBlox u-blox NEO-6M / NEO-7M 
 *
 * Copyright (C) 2022 Westerhold, S. (AI5GW) 
 * ORCID: https://orcid.org/0000-0001-7965-3140
 * Web (EN): https://baltic-lab.com
 *
 * This program is free software: you can redistribute it and/or modify
 * it under the terms of the GNU General Public License as published by
 * the Free Software Foundation, either version 3 of the License, or
 * (at your option) any later version.
 */


// CFG-NAV5: Set navigation mode to stationary
byte CFG_NAV5_STATIONARY[] = { 0xB5, 0x62, 0x06, 0x24, 0x24, 0x00, 0xFF, 0xFF, 0x02, 0x03, 0x00, 0x00, 0x00, 0x00, 0x10, 0x27, 0x00, 0x00, 0x05, 0x00, 0xFA, 0x00, 0xFA, 0x00, 0x64, 0x00, 0x2C, 0x01, 0x00, 0x3C, 0x00, 0x00, 0x00, 0x00, 0x00, 0x00, 0x00, 0x00, 0x00, 0x00, 0x00, 0x00, 0x4E, 0x60 };

// UBX CFG-CFG: BBR + FLASH:
byte CFG[] = { 0xB5, 0x62, 0x06, 0x09, 0x0D, 0x00, 0x00, 0x00, 0x00, 0x00, 0xFF, 0xFF, 0x00, 0x00, 0x00, 0x00, 0x00, 0x00, 0x03, 0x1D, 0xAB };

// UBX CFG-TP5 Timepulse 5: 10 kHz, 50 uS (50 % duty cycle), synch to UTC Time, No Putput when unlocked
byte TP5_10K_LOCK[]{ 0xB5, 0x62, 0x06, 0x31, 0x20, 0x00, 0x00, 0x01, 0x00, 0x00, 0x32, 0x00, 0x00, 0x00, 0x01, 0x00, 0x00, 0x00, 0x10, 0x27, 0x00, 0x00, 0x00, 0x00, 0x00, 0x00, 0x32, 0x00, 0x00, 0x00, 0x00, 0x00, 0x00, 0x00, 0x7F, 0x00, 0x00, 0x00, 0x73, 0xF3 };

// Timepulse 5: 100 kHz, 5 uS (50 % duty cycle), synch to UTC Time, No Putput when unlocked
byte TP5_100K_LOCK[]{ 0xB5, 0x62, 0x06, 0x31, 0x20, 0x00, 0x00, 0x01, 0x00, 0x00, 0x32, 0x00, 0x00, 0x00, 0x01, 0x00, 0x00, 0x00, 0xA0, 0x86, 0x01, 0x00, 0x00, 0x00, 0x00, 0x00, 0x05, 0x00, 0x00, 0x00, 0x00, 0x00, 0x00, 0x00, 0x7F, 0x00, 0x00, 0x00, 0x36, 0x36 };

void setup() {
  Serial.begin(9600);
  // Set Timepulse output to 100 kHz, 50 % duty-cycle
  Serial.write(TP5_10K_LOCK, sizeof(TP5_10K_LOCK));
  // Set navigation mode to stationary
  Serial.write(CFG_NAV5_STATIONARY, sizeof(CFG_NAV5_STATIONARY));
  // Store settings permanently
  Serial.write(CFG, sizeof(CFG));
}

// loop switches between 10 kHz and 100 kHz every 10 seconds
void loop() {
  Serial.write(TP5_10K_LOCK, sizeof(TP5_10K_LOCK));
  delay(10000);
  Serial.write(TP5_100K_LOCK, sizeof(TP5_100K_LOCK));
  delay(10000);
}


JFET-based infinite impedance detector for AM-demodulation

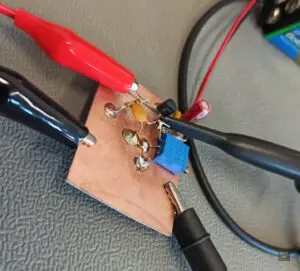
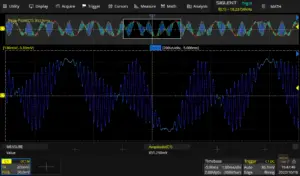
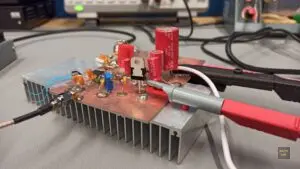
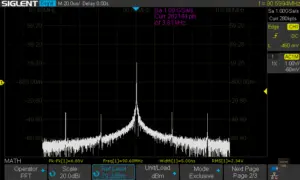
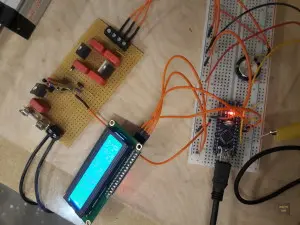
The so-called “infinite impedance detector” is a circuit that was commonly used in the old days of vacuum tubes. Since vacuum tubes can be somewhat considered to be heated JFETs, it is evident that such a circuit can also be built using a more modern, silicon-based approach. This article covers my first experiments with a BF256B based infinite impedance detector.

General Overview

Infinite impedance detectors got their name from their extremely high input impedance. Of course, the real input impedance is anything but infinite. But it is relatively large. Vaccum tube based infinite impedance detectors have been around for a long time [1]. They promise high-fidelity and low harmonic distortion compared to simple diode detectors when used for AM-demodulation [2].

Testing the infinite impedance AM-detector: 10.7 MHz AM signal with 80 % modulation depth at 1.5 kHz.

Testing the infinite impedance AM-detector: 10.7 MHz AM signal with 80 % modulation depth at 1.5 kHz

The following circuit was used for testing purposes:

Schematic of the JFET-based infinite impedance detector used in my experiments. R101, C102 and C103 have been omitted in the test circuit.

Schematic of the JFET-based infinite impedance detector used in my experiments. R101, C102 and C103 have been omitted in the test circuit.

The working principle is rather simple: The active device, in this case a BF256B JFET, is self-biased by R103 in a way, that the gate to source voltage is essentially equal to the pinch-off voltage of the JFET. Therefore, the negative half-wave of the incoming AM-signal will have little to no effect on the voltage seen over R103. The positive half-wave, however, allows the JFET to conduct more. Thus the source voltage will follow the positive half-wave of the AM-signal applied to the gate of the JFET. The impedance “seen” by the AM-source is solely the (typically very high) gate impedance of the JFET in parallel with R102 (100 K). The previous stage is, therefore, not loaded all too much by the infinite impedance detector.

JFET-based infinite impedance detector for AM demodulation using a BF256B

JFET-based infinite impedance detector for AM demodulation using a BF256B

C104 plays a critical role in the demodulation process: Its job is to low-pass filter in order to remove the rf-component (AM carrier) contained in the positive half-wave. If the value of C104 is chosen too high, the higher audio components will also be surpressed. If, on the other hand, the value of C104 is too low, the AM carrier may not be surpressed satisfactorily. 10 nF works fine for AM-voice transmissions with a cut-off of about 3 kHz. For broadcast AM-signals, the value should be lowered significantly. Literature on vaccum tube implementations of this circuit suggest that the time-constant of R103 and C104 should be chosen to be several times the period of the lowest carrier frequency.

R101, C102 and C103 have been omitted in my test-circuit. R101 should be around 100 Ohms. C103 should be chosen so that the lowest frequency components of the audio signal will not be impeded. C102 is not too critical, 100 nF will be fine for an intermediate frequency (IF) of 455 kHz or higher.

Test Results

For the first test I used a common IF-frequency of 455 kHz. The 455 kHz was amplitude modulated with a single 1.5 kHz tone at a 80 % modulation depth. The signal was then fed directly from the SDG 1032X signal generator into the gate of the previously shown circuit.

Yellow trace: 455 kHz carrier, amplitude modulated at 80 % depth with a single 1.5 kHz tone. Purple trace: Demodulated audio signal from the infinite impedance detector

Yellow trace: 455 kHz carrier, amplitude modulated at 80 % depth with a single 1.5 kHz tone. Purple trace: Demodulated audio signal from the infinite impedance detector

As shown on oscilloscope, the 1.5 kHz tone was demodulated perfectly. The amplitude of the input signal could be varied between about 500 mVpp and 4 Vpp without any visible distortion. Out of curiosity I checked if this circuit can also handle a IF-frequency of 10.7 MHz.

Yellow trace: 10.7 MHz carrier, amplitude modulated at 80 % depth with a single 1.5 kHz tone. Purple trace: Demodulated audio signal from the infinite impedance detector

Yellow trace: 10.7 MHz carrier, amplitude modulated at 80 % depth with a single 1.5 kHz tone. Purple trace: Demodulated audio signal from the infinite impedance detector

As shown above, an AM-modulated signal at an IF of 10.7 MHz is also not a problem fo this circuit. As a matter of fact, the circuit actually worked well up to 30 MHz. However, a drop-off of the output amplitude was observed starting at around 20 MHz.

YouTube-Video


Due to popular demand, I published a YouTube-Video about the JFET-based infinite impedance detector on my channel:

Links and Sources:

[1] Chaffe, E. L. Cobine, J. D., Mimno, H. R., Cooke, S. P., Morris, L. W., Cornett, R. O., Stockman, H., Githens, S., Tatum, G. R., LeCorbeiller, P. E., Wing, A. H., (1947): Electronic Circuits and tubes: By the Electronics Training Staff of the Cruft Laboratory, Harvard Univ., New-York, U.S.A.: McGraw-Hill Book Company, inc.

[2] Scerri, F. (2006). High Fidelity AM Reception. Elliott Sound Products. Retrieved July 29, 2022, from: https://sound-au.com/articles/am-radio.htm


Total Harmonic Distortion (THD) from dBc

How to calculate THD from dBc


This article supplements to my article titled THD Measurement with an Oscilloscope and FFT, which appeared in Elektormagazine [1]. Here I will explain how the formula to calculate THD-F from relative power values (in dBc) was derrived from the standard voltage-ratio formula. A more in-depth explanation of the entire subject can be found in my research paper titled Total Harmonic Distortion (THD) analysis utilizing the FFT capabilities of modern digital storage oscilloscopes [2].

The basic equation for calculating THD-F is as follows:

  THD_F &= \frac {\sqrt {\sum_{n=2}^{\infty} V_n^2}} {V_1}

V1 refers to the rms voltage amplitude of the fundamental frequency (also called 1st harmonic), Vn refers to the rms voltage amplitudes of the n-order harmonics of the fundamental frequency.

This formula can be written in its expanded. A poperty that will become useful later. The expanded form is as follows:

  THD_F &= \sqrt{\frac {V_2^2} {V_1^2} + \frac {V_3^2} {V_1^2} + \frac {V_4^2} {V_1^2} + \frac {V_5^2} {V_1^2}} ...

The equation for relative power measurements in dBc is as follows:

  dBc &= 10\log_{10}(\frac {P_n}{P_1})

Where Pn is the power of the n-order harmonic in dBm, P1 is the power of the reference carrier, in this use case the power of the fundamental frequency.

The fact that Power is defined as rms Voltage squared and the system impedance will be equal for both Pn and P1, the Pn to P1 power ratio is equal to the ratio of the squared rms voltage amplitudes of the corresponding signals:

  \frac {P_n}{P_c} = \frac{\frac{V_n^2}{R}}{\frac{V_1^2}{R}} =  \frac {V_n^2}{V_1^2}

Looking back at the second formula, it becomes obvious why this property is useful. This property can now be combined with the (expanded) THD-F formula, yielding the following, compact equation:

  THD_F &= \sqrt {\sum_{n=2}^{\infty} 10^{(P_n/10)}}

Links and Sources:

[1] Westerhold, S. (2023), THD Measurement with an Oscilloscope and FFT: https://www.elektormagazine.com/magazine/elektor-288/61444
[2] Westerhold, S. (2022). Total Harmonic Distortion (THD) analysis utilizing the FFT capabilities of modern digital storage oscilloscopes. https://www.researchgate.net/publication/362542224


Generate a stereo-FM multiplex waveform with Python and AWG

Generating more complex arbitrary waveform files for modern test equipment doesn’t have to be difficult. For a recent project, I needed a stereo-FM multiplex (MPX) signal containing two different tones in the left and right stereo audio channels. This article is going to show how to generate such a MPX signal for Siglent SGD-series arbitrary waveform generators with Python and PyVISA.

UPDATE: There also is a German version of this article available on my German blog: Stereo-Multiplexsignal mit einem Funktionsgenerator und Python erzeugen

General Overview

The way stereo-FM works is both simple and sophisticated at the same time. First, sum and a difference signals of the left and right audio channels are created. The sum signal ensures backward compatibility with legacy mono FM receivers. A double sideband signal centered around 38 kHz is generated using the difference signal and a 38 kHz carrier. Lastly, a 19 kHz pilot tone, that is phase coherent to the 38 kHz carrier used in the previous step, is added to the previous 2 signals with a relative amplitude of 10 %. All three signals are then transmitted together using FM modulation. This is a short and simplified explanation. For a better explanation, feel free to watch my YouTube video on the theory of FM stereo multiplexing [1].

My goal was to generate a valid MPX signal containing a 700 Hz tone in the left audio channel and a 2200 Hz tone in the right audio channel. On the hardware side I settled on using my Siglent SDG1032X arbitrary waveform generator (AWG). On the software side, I decided on using Python with PyVISA and NI-VISA. The latter two offer a very convenient way of communicating with the AWG via Ethernet.

Stereo-FM multiplex signal generation with SDG1032X and Python

Stereo-FM multiplex signal generation with SDG1032X and Python

Waveform Math

The first step was to figure out how to generate the necessary datapoints for the MPX signal. In order to achieve this, equations describing all components of the final signal in a mathematical form needed to be formulated. For the sum signal, the DSB modulated difference signal and the 19 kHz pilot tone, the equations are as follows:

Equation for the sum (L+R) signal:
Sum = sin(700 \omega t)+sin(2200 \omega t)

Equation for the difference (L-R) double sideband signal with 38 kHz carrier:
Diff= sin(38000 \omega t) \cdot (sin(700 \omega t)-sin(2200 \omega t))

Equation for the 19 kHz pilot tone:
Pilot = 0.1 \cdot sin(19000 \omega t)

Where ω in this case is a normalization factor to convert the frequencies from cycles per second to radians per sample. Time – expressed as sample number – is represented as t. For the Python / SDG combination, the normalization factor ω is π divided by twice the sample rate. Since the sum, DSB modulated difference and pilot tone signal are simply added together, the overall equation for the desired MPX signal can be written as follows:

sin(700 \omega t)+sin(2200 \omega t) + sin(38000 \omega t) \cdot (sin(700 \omega t)-sin(2200 \omega t)) + 0.1 \cdot sin(19000 \omega t)

Note that this equation will return a maximum value of 2.1 and a minimum value of -2.1. So when scaling this equation to the desired maximum amplitude, the amplitude values needs to be multiplied by the inverse of 2.1, or multiplied by about 0.47.

Python implementation

The entire Python code, along with other Python / PyVISA example scripts, is available from my SIGLENT GitHub repository [2].

The Python code needs to create an array of 16384 points filled with waveform data according to the aforementioned equations. While the following code snippet may not be the prettiest, it works:

# Create an empty array with 16384 points
WAVE = np.arange(0, 0xfffe, 1);

# Sample Rate in S/s
SAMPLE_RATE = 1638400

# Calculate factor for normalized frequency
F_FACTOR = (np.pi/(2*SAMPLE_RATE))

# Fill the waveform array with data
for n in range(len(WAVE)):

  # Amplitude (MAX 32767 on SDG1032X)
  Amplitude = 32767
  WAVE[n] = 0.47*Amplitude*(np.sin(700*F_FACTOR*n)+np.sin(2200*F_FACTOR*n)+0.1*np.sin(19000*F_FACTOR*n)+np.sin(38000*F_FACTOR*n)*(np.sin(700*F_FACTOR*n)-np.sin(2200*F_FACTOR*n)))

The generated waveform data is then sent to the SDG using the write_binary_values of the PyVISA package and the necessary SCPI commands. This of course requires the PyVISA package and the NI-VISA API to be installed and that a connection to the device has been established.

# Write Waveform to Device
# Note: byte order = little-endian!
device.write_binary_values('C1:WVDT WVNM,STEREO_MPX,FREQ,100.0,TYPE,8,AMPL,1.0,OFST,0.0,PHASE,0.0,WAVEDATA,', WAVE, datatype='i', is_big_endian=False)

That’s it! The entire code can be downloaded from GitHub [2].

Results

After executing the Python code and sending the generated waveform to the SDG1032X, the MPX signal is generated as intended. Since only two distinct tones are being generated, the corresponding spectral components and their relative amplitudes can clearly be observed if viewed in the frequency domain:

Frequency domain view of generated MPX signal

Frequency domain view of generated MPX signal

And just for completeness, here’s the same signal in the time domain:

Time domain view of generated MPX signal

Time domain view of generated MPX signal

Conclusions

In essence, it could be said that as long as an equation for a waveform can be formulated, it is rather simple to generate arbitrary waveform files to ones heart’s content. Of course there are some limitations to this. In this case mostly the relatively small 16384 possible points. Nonetheless, the framework of the Python code provided offers great versatility for the quick implementation of arbitrary waveforms. Just adapt the line beginning with “WAVE[n] =” to implement your own waveforms. The GitHb repository contains a few more simplistic examples as well.

Links and Sources:

[1] BalticLab (2016): Stereo Multiplexing for FM Transmission | Theory

[2] AI5GW (2022): Python code examples for SIGLENT equipment


SITOR-B / NAVTEX Test Signal Generation

This article shows how to generate valid NAVTEX message bitstream using an Arduino. The Arduino implements proper CCIR476 character encoding, SITOR-B forward error correction, synchronization and phasing signals. An entry-level function generator is then used as a FSK modulator on 518 kHz where it can be received by a NAVTEX receiver.

UPDATE: There also is a German version of this article available on my German blog: SITOR-B / NAVTEX Testsignal mit Arduino und Funktionsgenerator erzeugen

General Overview

Originally, I wanted to show how to repair a “NAV4 Navtex” NAVTEX receiver by ICS Electronics that’s been sitting in my junk box for a while now. But the repair turned out to be rather boring. After realigning the filters of the input stage, the receiver came back to life. During testing, another problem emerged though. NAVTEX stations transmit on a fixed schedule. Therefore, I had to wait for 4 hours between tests in order to wait for the next transmission from the Deutsche Wetterdienst (DWD). Since I had previously generated avionics related test signals (e.g. ILS Localizer / Glide Slope Test Signal Generation at home), I decided to dive into the maritime world of radio communication and try so find an easy way to generate valid NAVTEX signal myself.

NAV4 Navtex by ICS Electronics

NAV4 Navtex by ICS Electronics

NAVTEX (NAVigational TEleX) is a radioteletype service used in the maritime world to distribute navigational and meteorological warnings and forecasts. Even though the system is quite old, the International Convention for the Safety of Life at Sea (SOLAS) still requires certein vessels to be equipped with NAVTEX receivers. The system transmits CCIR476 encoded characters at a rate of 100 baud on 518 Khz or 490 kHz using Frequency-shift keying (FSK). The NAVTEX message format is layered on top of SITOR (SImplex Teletype Over Radio) mode B. Since SITOR-B uses basic forward error correction (FEC), NAVTEX messages are somewhat robust to interference and in weak signal situations.

CCIR476 Character Encoding

CCIR476 is a 7-bit character encoding similar to 5-bit Baudot code. In a valid character, exactly 4 of the 7 bits are ‘1’. Therefore, it is possible to perform a basic error detection on the receiver side. CCIR476 encoding is used for SITOR and AMTOR (Amateur Teleprinting Over Radio) transmissions. AMTOR is basically just the amateur radio equivalent of SITOR. Since there are Arduino libraries for all kinds of amateur radio relatet protocols, I was very confident that there would be a CCIR476 encoding library. But I was wrong. That was bad news, because it meant more legwork for me. But there is good news for everyone who might want to use a CCIR476 encoding / decoding library as well: My CCIR476 library for Arduino [1] is now available through the Arduino library manager or directly from the GitHub repository [2].

CCIR476 encoding / decoding library available from the Arduino library manager

CCIR476 encoding / decoding library available from the Arduino library manager

CCIR476, just like Baudot code, uses two different character tables. One for letters and one for figures. Control characters are transmitted to switch between letters and figures mode. Having two look-up tables for ASCII characters and returning the corresponding CCIR476 character is an easy task. The library keeps track of whether or not the passed ASCII character is in the letters or figures table and provides a feedback function to detect mode changes in order to transmit the necessary control characters.

SITOR-B / NAVTEX Protocol

The International Telecommunication Union (ITU) is a good place to find specifications of communication protocols. On their website I found the ITU recommendation M.476-5 titled “Direct-printing telegraph equipment in the maritime mobile service” [3].

The TL;DR summary of the document comes down to two important points: Transmissions are initiated by sending the Phasing Signal 1 & 2 alternatingly. Every character is transmitted twice with 4 other characters in between. Transmissions are terminated by sending the phasing signal 1 three times in a row as “end of emission signal”.

The document describes the FEC implementation as follows:

The station sending in the collective or in the selective B-mode (CBSS or SBSS) emits each character twice: the first transmission (DX) of a specific character is followed by the transmission of four other characters, after which the retransmission (RX) of the first character takes place, allowing for timediversity reception at 280 ms time space;

Translated to the Arduino program, a transmit buffer was used to implement the FEC according to the specifications. The relevant code looks like this:

void SITOR_Transmit_FEC(byte SYM)
{      
     Transmit_SYMBOL(SYMBOL_BUFFER_1);
     SYMBOL_BUFFER_1 = SYMBOL_BUFFER_2;
     SYMBOL_BUFFER_2 = SYMBOL_BUFFER_3;
     SYMBOL_BUFFER_3 = SYM;  
     Transmit_SYMBOL(SYMBOL_BUFFER_3);  
}

Besides fulfilling the requirements of the SITOR-B protocol, there are also NAVTEX specific protocol demands. NAVTEX requires any message to be initiated by transmitting the characters “ZCZC” and to be terminated by the characters “NNNN”. After the initiating “ZCZC” characters, a 4-character “header” is transmitted. The header contains a transmitter identity character, a subject indicator character and two message serial number characters. My example code uses “SA00”, whereas “S” stands for the DWD transmitter in Pinneberg Germany, the “A” identifies the message as a navigational warning and the “00” is the serial number of the message.

Test Setup and Results

The example sketch was compiled and flashed to an Arduino Uno. When power is applied to the Arduino, it outputs a CCIR476 encoded bitstream using the SITOR-B / NAVTEX protocol at the correct rate of 100 baud on digital pin 2.

NAVTEX bitstream output on digital pin 2 of the Arduino

NAVTEX bitstream output on digital pin 2 of the Arduino

The bitstream from the Arduino Uno was then connected to the “Aux In/Out” connector of a Siglent 1032X function generator. The function generator was set to a frequency of 517.915 kHz. The inbuilt FSK modulation feature was enabled, the modulation source set to “External” and the FSK hop frequency set to 518.085 kHz.

Siglent 1032X used as FSK modulator for SITOR-B / NAVTEX test signal generation

Siglent 1032X used as FSK modulator for SITOR-B / NAVTEX test signal generation

After resetting the Arduino Uno it didn’t take long until the “SBY” LED of the Navtex receiver started blinking. Shortly afterwards, the thermal printer of the receiver came to life and printed the transmitted test message without errors.

The NAVTEX test signal was successfully received on a NAV4 Navtex receiver

The NAVTEX test signal was successfully received on a NAV4 Navtex receiver

Bonus Material

Even though FSK modulation functionality is fairly standard on modern function generators, a SI5351A clock generator breakout board was also tested successfully for the 518 kHz FSK signal generation. The source code for the SI5351A based version is also included in the CCIR476 library example folder. It can also be found here.

There also is a short video of the test setup. And yes, the video was recorded with a potato, so enjoy:

Conclusions

This project proves that sometimes it is quite educating to invest several days of work in order to avoid waiting for 4 hours. If I would have just waited the 4 hours, I wouldn’t have learned much about CCIR476, SITOR-B and NAVTEX. Neither would I have learned about the process of writing and submitting own libraries to the Arduino library index. Sometimes impatience leads down very interesting roads.

Maybe this project will inspire some people to conduct their own SITOR-B or AMTOR experiments. Or at least inspire to experiment with using a simple Arduino as bitstream generator for test signal generation in general.

Links and Sources:

[1] CCIR476 Arduino library, GitHub: https://github.com/AI5GW/CCIR476

[2] CCIR476 Arduino library, arduino.cc: https://www.arduino.cc/

[3] ITU recommendation M.476-5, ITU: https://www.itu.int/